Thursday, August 27, 2015

Fall Decor - Fabric Pumpkins


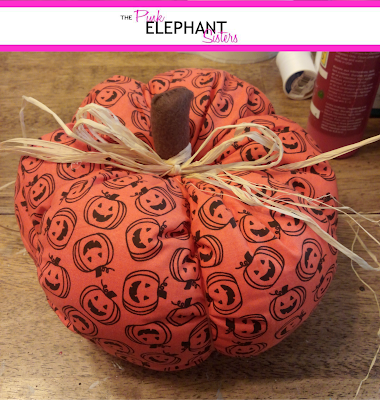
These Fabric Pumpkins were the second project we completed on our epic crafting day.  Check them out and see if you want to make them yourselves or if you just want to purchase one of these, go see Kari at the Cedarville Barn Autumn in the Country event in Oakville on Friday and Saturday September 25th and 26th from 10-5 or at the Country Chicks Harvest Fair at the Southwest Washington Fairgrounds on Friday and Saturday October 2nd (10-6) and 3rd (10-4).  Both of these events are really a great place to get inspiration and some really awesome handmade goods from talented people.  On to the craft...


I have to admit this is one of my favorite projects that we have done.  It was fun, quick and pretty easy.  We got our inspiration from here.  The best part for me was picking out the fabrics.  You can choose 1, 2 or 3 different fabrics.  You could do more but I think they look best with 6 sections.  No matter how many fabrics, you want your total overall size to be about 24" wide and no more than 12" tall.  These make a good size pumpkin.  Any taller and you will have some trouble with getting the long needle through.

Chose your coordinating fabrics and iron them out.  Measure your pieces on the reverse side and mark were you need to cut.  These pieces are 13 1/2" by 4".  Remember when I said no longer than 12"?  Seriously, no longer than that.  It was really difficult later.

Once your pieces are cut, match them up and sew the long sides together.   You will end up with all six pieces in one long sheet.  Now sew the ends together to form a cylinder shape.

Thread a needle and double the thread.  Tie off the thread and begin sewing one end of the cylinder closed using a running or basting stitch.  Basically just in one side and then in the other side.  At the end, pull the thread taut and tie off.  This will gather the fabric in a tight zig zag.  This is the bottom of the pumpkin.  Flip the fabric right side out and you should end up with a sack like shape. 
Stuff the sack with Poly-Fil or other soft fiber filler.  Take the same thread from before and do another running or basting stitch around the edge of the open side.  Unlike the bottom, this stitch runs around the rim and then pull it taut.  This will mostly close the other side, leaving you with a stuffed cylinder and small opening.

Take a long, slim needle (5" or so) and thread it with embroidery thread of a corresponding color.  Tie off the end and start in the center of the first side you sewed together, the bottom. Push it through and out the small opening in the top.  Go around the outside of the pumpkin, on a seam.  Continue this process for all 6 seams, pulling each tight, tufting the fabric.  Do not tie this off yet.

Use a small piece of felt, about 2 1/2" x 3 1/2".  Fold it in half and using the same black thread from before, use a whip stitch to close the top and open side.  Leave the bottom open.  You can turn the felt right side out or leave it with the stitching on the outside.  Next you will fill it with the Poly-Fil or other filling, then stitch the bottom closed.  Take the large needle and embroidery thread and attach the stem.  You will run it through the bottom and top a few times to secure it before tying it off.

 Here are some of the finished pumpkins.  As you can see, you can use many different fabrics, textures and sizes.  Variety is the spice of life, right?

 We both disliked this fabric with anything else but it works great on it's own.

 Pardon the multiple backgrounds.  I did some of these at Kari' house, a few in my bedroom and a few in my living room.  It's a great craft to do while watching tv. I love this green pumpkin.  The leaves and stem are precious.

 I got lucky and found this sequined fabric in the remnant bin at JoAnn's.  It looks fabulous.

You can see the different sizes and variations I used.  Did I mention I loved this craft?!?!?!

Wednesday, August 19, 2015

Weight Loss Journey: Nephew Adventures, Gym Etiquette and Meal Prep

A few weekends ago we had my nephew Logan over.  He is almost 5 and really energetic.  We decided to surprise him and take him to the beach on Saturday.  He had so much fun playing in the sand and at the playground we found.  He and I even walked through the Battery at Fort Columbia.  My only problem was he kept running off from me and it was freaking me out.  I am not up to 5 year old speed yet.


At the park, I decided to see if my skills were still up to par.  Nope!  I realized I could not hang for any more than a few seconds.  So I set a goal for myself to be able to do Monkey Bars again at some point.  I did climb the large toy in the center of the playground.  And while I was too afraid to do much else, it felt great to be up there.  I also clocked in 8 flights of stairs on my FitBit by going up and down.  If you think, because you are a Mom, you don't have time for a workout, you are wrong.  Just get out there and play with the kids.  Plus, swinging is so much fun!


I have been at Planet Fitness for 4 months now and have made a few observations I would like to share.  These are not be being judgmental, just things I see:
#1 - Get off your phone while you are working out.  Leave your phone in your locker and enjoy your workout.  I see people sitting on machines, texting or even talking.  It's rude to other people in the gym and there is no way you are focusing on your workout.
#2 - Light gray yoga pants are not a smart choice.  Just an observation but when you sweat, that color yoga pants changes color.  I felt bad for one woman.  It looked like she had wet herself.
#3 -  Make friends.  If, like me, you go to the gym at a certain time every day, it is likely that you see some of the same people.  Say hi, smile, be friendly.  You are both there for the same reason.


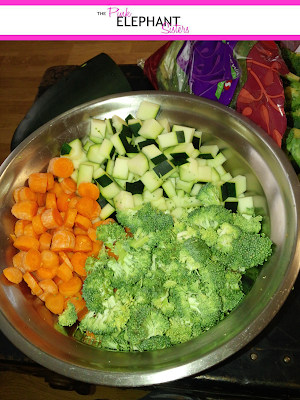
Through this journey I have spent many Sundays meal prepping.  Honestly, the biggest plus is that I can sleep in a bit.  My most recent set of prep included roasted vegetables (carrots, zucchini and broccoli), boiled chicken and quinoa.  I prefer to eat this kind of food for breakfast, having a morning snack at 11 and then lunch at 2:30 after my workout.  This particular week, my 11 am snack was the Kale Power Salad that I have talked about before and my 2:30 salad of greens, ground turkey and feta.  After the first day, I decided to modify the base meal and have a hot breakfast.


Here is exactly what was in each day's meal:
1.25 cups Roasted Vegetables, 1 cup boiled chicken thighs, 1 cup cooked quinoa (480 calories)
Day 1:  No Modification
Day 2:  Add 2 over easy eggs (add 147 calories)
Day 3:  Add 1 cup chicken stock (add 80 calories)
Day 4:  Add 1/2 cup egg substitute (add 62 calories)
Day 5:  Add 1/4 cup egg substitute and 1/4 cup mozzarella cheese (add 101 calories)
It was so good, healthy and filling.


From July 15th to August 15th, I only lost 6 lbs.  It was a rough month.  My weight loss has definitely slowed down.  In fact, I had not gained but I hadn't lost in over 2 weeks.  I did some research online, asked my fellow Blog to Lose ladies and contacted my nutritionist.  It turns out I haven't been eating enough.  I had been sticking to about 1800 calories and burning about 3800 in a day.  Well, that had slowed my metabolism and put my body into starvation mode.  So after talking to a few people, I upped my calories to 2300 to 2500 as my target.  After 2 days, I lost 3 lbs in 3 days.    I had just reset my body and my total loss is 87 lbs.  I am just 13 lbs from my 100 lb goal and 16 lbs from being under 400 lbs.

Wednesday, August 12, 2015

DIY Bleach Shirts

We are back folks!  I know I have sort of hijacked the blog.  It has been all weight loss and diabetes information for six months or so.  It has consumed my life too but now I am back into crafting, sewing and cooking.  As always, the blog will reflect what is going on our lives.

Kari and I made plans to meet up and get a few projects banged out in one day.  We had a very productive Saturday, even with her 3 boys there.  I honestly don't know how she does it.  They wear me out.  Her boys are almost 5, almost 2 and 1 month old.  Our first project is the one I am going to share today.
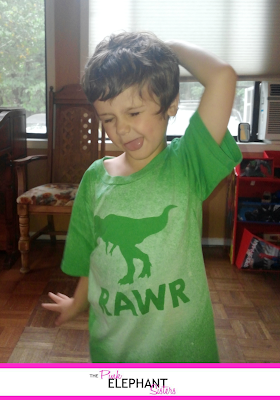
Isn't our model just so precious?!?

These DIY Bleach shirts were inspired by this pin.  The supplies are simple.


Bleach
Spray Bottle
T-Shirt (darker colors work better)
Cardboard
Stencil

 Start by placing the cardboard inside your shirt and make sure it is flat.  You can iron if you want but, umm, no.

Next, you want to lay out your stencil or design.  


We used vinyl cut on a Silhouette machine.


You just want to make sure it is straight and positioned where you want it.


Just spray a fine mist of the bleach from the squirt bottle.  We did 3 or 4 squirts and you can see it starts to change quickly.  Dab any pooling bleach with a paper towel


In just 2 or 3 minutes, you can remove the stencil and see the results.


After you remove the stencil, rinse the shirt thoroughly in cold water.


Hang the shirts to air dry.


After they dry for a bit, run the shirts through the washer and dryer on a normal cycle, just the shirts.

And Tah-Dah, there you have a simple, quick DIY shirt made from things you have in your house already.