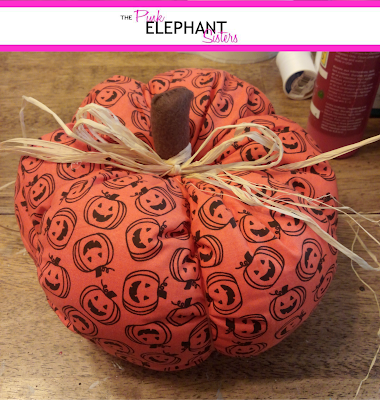
These Fabric Pumpkins were the second project we completed on our epic crafting day. Check them out and see if you want to make them yourselves or if you just want to purchase one of these, go see Kari at the Cedarville Barn Autumn in the Country event in Oakville on Friday and Saturday September 25th and 26th from 10-5 or at the Country Chicks Harvest Fair at the Southwest Washington Fairgrounds on Friday and Saturday October 2nd (10-6) and 3rd (10-4). Both of these events are really a great place to get inspiration and some really awesome handmade goods from talented people. On to the craft...
I have to admit this is one of my favorite projects that we have done. It was fun, quick and pretty easy. We got our inspiration from here. The best part for me was picking out the fabrics. You can choose 1, 2 or 3 different fabrics. You could do more but I think they look best with 6 sections. No matter how many fabrics, you want your total overall size to be about 24" wide and no more than 12" tall. These make a good size pumpkin. Any taller and you will have some trouble with getting the long needle through.
Chose your coordinating fabrics and iron them out. Measure your pieces on the reverse side and mark were you need to cut. These pieces are 13 1/2" by 4". Remember when I said no longer than 12"? Seriously, no longer than that. It was really difficult later.
Once your pieces are cut, match them up and sew the long sides together. You will end up with all six pieces in one long sheet. Now sew the ends together to form a cylinder shape.
Thread a needle and double the thread. Tie off the thread and begin sewing one end of the cylinder closed using a running or basting stitch. Basically just in one side and then in the other side. At the end, pull the thread taut and tie off. This will gather the fabric in a tight zig zag. This is the bottom of the pumpkin. Flip the fabric right side out and you should end up with a sack like shape.
Stuff the sack with Poly-Fil or other soft fiber filler. Take the same thread from before and do another running or basting stitch around the edge of the open side. Unlike the bottom, this stitch runs around the rim and then pull it taut. This will mostly close the other side, leaving you with a stuffed cylinder and small opening.
Take a long, slim needle (5" or so) and thread it with embroidery thread of a corresponding color. Tie off the end and start in the center of the first side you sewed together, the bottom. Push it through and out the small opening in the top. Go around the outside of the pumpkin, on a seam. Continue this process for all 6 seams, pulling each tight, tufting the fabric. Do not tie this off yet.
Use a small piece of felt, about 2 1/2" x 3 1/2". Fold it in half and using the same black thread from before, use a whip stitch to close the top and open side. Leave the bottom open. You can turn the felt right side out or leave it with the stitching on the outside. Next you will fill it with the Poly-Fil or other filling, then stitch the bottom closed. Take the large needle and embroidery thread and attach the stem. You will run it through the bottom and top a few times to secure it before tying it off.
Here are some of the finished pumpkins. As you can see, you can use many different fabrics, textures and sizes. Variety is the spice of life, right?
We both disliked this fabric with anything else but it works great on it's own.
Pardon the multiple backgrounds. I did some of these at Kari' house, a few in my bedroom and a few in my living room. It's a great craft to do while watching tv. I love this green pumpkin. The leaves and stem are precious.
I got lucky and found this sequined fabric in the remnant bin at JoAnn's. It looks fabulous.
You can see the different sizes and variations I used. Did I mention I loved this craft?!?!?!


No comments:
Post a Comment