Showing posts with label Quick. Show all posts

Thursday, February 25, 2016

Quiet Book for Nephew #2

 If you have been reading this blog since the beginning, you may remember the Quiet Book (or sometimes called Busy Book) I made for Logan, Nephew #1.  I gave it to him for his 2nd Birthday so I knew I had to do the same for Nephew #2, Landon.  I have roughly 16 months until I have to have my final one done for Nephew #3, Leo.


Here is the cover of Landon's book.  I used denim, felt, bias tape a button and an elastic hair tie.  You can see a snarl on the bottom.  I was having problems with the tension in my machine and actually broke the bobbin.  Next, the screw broke that holds the presser foot.  It was a hot mess, to say the least.  His name is made of felt that I fabric glued.  I sewed a hair tie to the back and then used a button to secure it shut.


Page #1 is a clock page.  The hands can move and are made of plastic that i colored with a black sharpie.  The face is felt with fabric paint.  The background is meant to represent night and day.  It was the first page I put together and one of my favorites.


This is the first of 3 two-page spreads.When Landon was younger, he used to throw socks everywhere.  So, when I saw this idea online I knew I had to try.  I redid this page a few times.  I screwed up the door and it was trial and error with the socks.  I needed a strong enough magnet but thin enough to not make the page bulky.  There are three sock cut outs in each pattern.  One to glue to the page with a strip magnet underneath and the other two get sewn together with a small strong magnet I got at Harbor Freight.  He can put them in the dryer or the basket or keep them on the magnetic page.


Nest is a puzzle kite.  Nothing too extreme.  However, I learned from Logan's book that all parts should be attached to the book somehow.  Each piece has a string of rik rak sewn to it then they are sewn to the page under the bow.  The puzzle pieces are felt and there is a small piece of velcro on the back of each.  There is a full kite shape underneath that the velcro sticks to.


I am not overly thrilled with this page but I do love the kid in the puddle.  He is made from felt, hand stitched and so cute.  This should help him learn his colors and how to spell them.


This is the counting page.  I used the same fabric as Logan's counting page in his book.  It was fabric my mom gave me that she had for years.  I simply strung beads and buttons on ribbon, glued felt numbers and sewed the ribbon to the page.


This is the girliest page in the book.  It should help him learn how to use buttons.  Each flower has a slit in it with rik rak glued to it.


This pizza page should also help him with counting.  Plus, who doesn't love pizza?  I made sure the pieces were attached to the book but they have since been ripped out by him so I will have to figure something better out.  The pizza is made of felt and glued together.


The shapes and textures on this page are really cute.  I got the textured felt on clearance at Wal-Mart for 10 cents a sheet.


I call this final page the Puppy Page.  It will help him learn to use a slide closure.  It's so cute and was really easy.  The dog is made of felt and the spots are glued on.  I got the dog collar at the dollar store.  

All in all I love the book.  It took many hours and a lot of supplies but my nephews are worth every pin prick.

Thursday, August 27, 2015

Fall Decor - Fabric Pumpkins


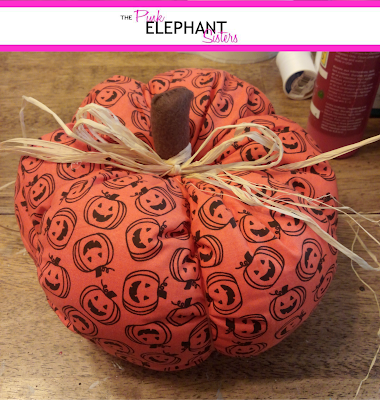
These Fabric Pumpkins were the second project we completed on our epic crafting day.  Check them out and see if you want to make them yourselves or if you just want to purchase one of these, go see Kari at the Cedarville Barn Autumn in the Country event in Oakville on Friday and Saturday September 25th and 26th from 10-5 or at the Country Chicks Harvest Fair at the Southwest Washington Fairgrounds on Friday and Saturday October 2nd (10-6) and 3rd (10-4).  Both of these events are really a great place to get inspiration and some really awesome handmade goods from talented people.  On to the craft...


I have to admit this is one of my favorite projects that we have done.  It was fun, quick and pretty easy.  We got our inspiration from here.  The best part for me was picking out the fabrics.  You can choose 1, 2 or 3 different fabrics.  You could do more but I think they look best with 6 sections.  No matter how many fabrics, you want your total overall size to be about 24" wide and no more than 12" tall.  These make a good size pumpkin.  Any taller and you will have some trouble with getting the long needle through.

Chose your coordinating fabrics and iron them out.  Measure your pieces on the reverse side and mark were you need to cut.  These pieces are 13 1/2" by 4".  Remember when I said no longer than 12"?  Seriously, no longer than that.  It was really difficult later.

Once your pieces are cut, match them up and sew the long sides together.   You will end up with all six pieces in one long sheet.  Now sew the ends together to form a cylinder shape.

Thread a needle and double the thread.  Tie off the thread and begin sewing one end of the cylinder closed using a running or basting stitch.  Basically just in one side and then in the other side.  At the end, pull the thread taut and tie off.  This will gather the fabric in a tight zig zag.  This is the bottom of the pumpkin.  Flip the fabric right side out and you should end up with a sack like shape. 
Stuff the sack with Poly-Fil or other soft fiber filler.  Take the same thread from before and do another running or basting stitch around the edge of the open side.  Unlike the bottom, this stitch runs around the rim and then pull it taut.  This will mostly close the other side, leaving you with a stuffed cylinder and small opening.

Take a long, slim needle (5" or so) and thread it with embroidery thread of a corresponding color.  Tie off the end and start in the center of the first side you sewed together, the bottom. Push it through and out the small opening in the top.  Go around the outside of the pumpkin, on a seam.  Continue this process for all 6 seams, pulling each tight, tufting the fabric.  Do not tie this off yet.

Use a small piece of felt, about 2 1/2" x 3 1/2".  Fold it in half and using the same black thread from before, use a whip stitch to close the top and open side.  Leave the bottom open.  You can turn the felt right side out or leave it with the stitching on the outside.  Next you will fill it with the Poly-Fil or other filling, then stitch the bottom closed.  Take the large needle and embroidery thread and attach the stem.  You will run it through the bottom and top a few times to secure it before tying it off.

 Here are some of the finished pumpkins.  As you can see, you can use many different fabrics, textures and sizes.  Variety is the spice of life, right?

 We both disliked this fabric with anything else but it works great on it's own.

 Pardon the multiple backgrounds.  I did some of these at Kari' house, a few in my bedroom and a few in my living room.  It's a great craft to do while watching tv. I love this green pumpkin.  The leaves and stem are precious.

 I got lucky and found this sequined fabric in the remnant bin at JoAnn's.  It looks fabulous.

You can see the different sizes and variations I used.  Did I mention I loved this craft?!?!?!

Wednesday, April 1, 2015

March Goals, Week 4: Positivity

I was on a real high Sunday.  I was happy with my loss last week and I was really excited to see all the support and love I have behind me.  I got private messages, phone calls and texts.  You all know how to make a girl feel awesome.  My goal this week is to say 5 positive things that happened in my day.  I will share some with you.  Sunday's things included posting my blog, getting a call from both of my parents, getting a text from a really good friend and not having to leave the house all day.

I rewarded myself with Pizza on Monday and I was utterly disappointed.  I ordered a thin crust Chicken and Mushroom pizza.  I hated it.  I don't see the point in wasting the calories if it isn't going to be satisfying.  I can eat 2 slices for 500 calories.  There are much better tasting things I can have for those calories.  Maybe next time I will just get the wings.  I like those better anyway.  My positive things for Monday included another call from my Dad to ask me how much water he needed to make a recipe.  I love getting calls from my family to ask advice on cooking.  It must mean I'm doing something right.


Tuesday was a long day at work but I still made dinner when I got home.  I threw together Penne with Chicken and Turkey Meatballs.  I ate very little of the pasta but the meatballs were so good.  I just added some cumin, a couple eggs and a little panko and baked them for 20 minutes.  The recipe made 40 meatballs that were 26 calories each.  Tuesday's positive thoughts included that it was payday and I have a job.

I am becoming a really strong believer in a low carb lifestyle.  I have done hours of research on the subject and with my own personal experience, I don't think I will ever go back.  I sleep better, I have so much energy and I am losing without working very hard at it.  I know that I will have to start working out a lot more but for now, I am focused on food.  The month of March has been a real breakthrough month for me.

Friday I got off work an hour early, went to the grocery store and then headed home for a baking extravaganza.  My Aunt Nancy asked me to make the cake for my Uncle Rick's Surprise 50th Birthday.  I made a main Carrot Cake, which is his favorite, and then Orange Cremesicle, Chocolate Nutella and Caramel Apple Cupcakes.  Saturday I went to my sister's house to decorate them and hang out with her and my nephews.  Logan, who is 4 1/2 helped me make chocolate toppers but fell asleep before he could help me frost them.

Saturday night was the big party and we had a great time.  Then Sunday, I came back north to stay the night with at my sister's because I had to be in Olympia early on Monday.  I have such a good time with my nephews.  They are a big reason I am choosing to get healthy.  When one of them asks me to play tag or sit on the floor with them, I want to be able to do it.  Right now I just say I am too big.  Logan asked me to play freeze tag and I told him I couldn't run so he suggested we just walk really fast.  It's what I love most about him.  He is so considerate and genuine.

Monday I took my friend J to get a endoscopy.  My nephew Landon, who's 1 1/2, had woken us all up at 4:45 that morning.  Of course, he napped at 5:30.  I was pretty tired but stayed awake to get J home and back to his place.  I hung out with him for a bit to make sure he was ok and then started the 90 minute drive home.  I stopped in Grand Mound at McDonalds for food and ordered like my old self.  I ordered two 3-piece chicken selects and 2 McDoubles.  I ended up only eating one of each.  Old me would have slammed it all down before I hit Centralia.


All in all March was a great month.  I feel more focused and my mind feels clearer.  I got a lot of people encouraging me to keep it up and many comments on how I seemed happier.  I guess I just feel more alive.

Tuesday, December 11, 2012

Quick Christmas Craft Round-Up

To combat what was becoming a rather annoying Facebook game habit, I have taken up this blog. It gets me crafting and into the kitchen. It also keeps the guys at work happy when I bring in a baking project. This Christmas, I have been extra crafty and have been very "Pinspired". I thought I would share some of the crafts I have been doing these past few weeks.

These are gift tag/ornaments I made.  The Inspiration is here.

I loved how easy these recycled magazine bows were to make.  Inspiration here.

An adult size Tutu.  Inspiration here.

Something I put together and put up at work.  The guys love to come in and "Jingle My Bells".

When I first saw this, I knew I had to make it.

And finally, I made this garland but didn't take a photo of it so here is one of the snowmen.


Wednesday, November 28, 2012

Rolo Turtles

One of my favorite things to buy after a holiday on clearance, is a box of Turtles.  I have been seeing these Rolo Turtles all over Pinterest lately so I decided I had to make them.  I went to the Safeway to buy some of my baking supplies with my groceries and my regular checker asked me what I was up to because there was a bunch of "weird stuff" in my order.  I guess I go there a lot. :)


Rolo Turtles

Pretzels (I used the square ones)
Rolos
Pecans
Place the pretzels on a baking sheet, with space in between.  Then place a Rolo on each pretzel.

Put the pan in the oven at 350 for 4-5 minutes.  The candy will look shiny but not be melted.  Press a pecan into each Rolo.  Be careful not to push too hard and work fast.

Sunday, October 7, 2012

Ultimate Comfort Food: Tater Tot Casserole

My favorite dish as a kid was Tater Tot Casserole.  Someone always made it for family functions.  I hadn't had it in a very long time so I decided to throw it together and share it with you.

1 can Cream of Mushroom Soup
1 can Green Beans
1 can Corn
1 bag Tater Tots
1 lb Ground Beef
1 cup Shredded Cheese
Brown the beef, drain and cool.  In a bowl, mix everything but the tater tots and pour into a greased casserole dish.
Layer the tater tots on top
Top with the shredded cheese and cook for 45 minutes to an hour at 350.


Thursday, September 13, 2012

Slow Cooker Italian Chicken

I love slow cooker recipes.  I can throw them together before I leave for work and when I come home my house smells wonderful and dinner is ready.  I found this recipe here and adapted it for our taste.

6 Chicken Tenders
3 lbs Fingerling Potatoes
1 cup Italian Dressing
2 tbsp Italian Seasoning
1/2 cup Parmesan Cheese

Coat the slow cooker crock with non-stick cooking spray.  Place the chicken in the bottom of the crock.  Sprinkle with half of the seasoning, half the dressing and half the cheese.  Cut the potatoes into bite size pieces and layer on top of the chicken.  Sprinkle the remaining seasoning, dressing and cheese on top.  Cook on low for 7 hours.

Thursday, August 16, 2012

Hawaiian Pineapple Pork

I don't really like to follow recipes so its a tad bit ironic that half my blog is devoted to recipes.  So I say, start here and create your own flavors.  I read a super simple recipe for Hawaiian Crock Pot Chicken that used a bottled sauce, chicken breast and pineapple.  I read the ingredients of the bottled sauce and instead of spending $6 for it, I made my own with things I already had on hand.

Hawaiian Pineapple Pork
3 tbsp sugar
1/3 cup soy sauce
2 cups chicken broth
1 tbsp garlic
1 can pineapple chunks
2-3 lb pork roast
In the Crock Pot, I mixed the sugar, soy sauce, broth, garlic and the juice from the can of pineapple.  I then added the frozen pork roast, poured the pineapple chunks on top and set my timer for 8 hours on low.  Serve over rice.

When I got home, the house smelled wonderful and I was so looking forward to dinner.  Unfortunately I felt the sauce on this was too thin.  I didn't play with it because I was hungry when I got home but here are some suggestions I have to make it better, and if you try it, let me know.

-reduce the chicken broth to 1 cup or less (I am always paranoid about stuff drying out)
-up the soy sauce to 1/2 cup
-use more pineapple juice

The pork makes juice of its own as it cooks and my sauce never thickened.  I have, in the past, used a slurry of corn starch and cold water to thicken.  It really works.  Just turn the crock pot to high and let it go for about 30 minutes.  I hope to update this recipe soon with maybe a picture but it really is hard to make stuff that comes out of the crock pot look appetizing.

Tuesday, August 7, 2012

Hello Kitty Tote Bag Tutorial

We got invited to a Hello Kitty Pool Party for  an awesome little girl who was turning 4 and I knew I wanted to make her something special.  I just recently have taken up sewing and while my first purse was not a complete fail, I would never give it to someone else.

I headed down to JoAnn Fabrics to see if they had any Hello Kitty material.  I got lucky in that the Character fabrics were 30% off that week.  I picked out a really sweet pink paisley print for the lining, some bias tape for the trim and webbing for the handles.  $70 and 2 hours later, I was headed home with tons of stuff.  I can really lose track of time in there.  So much to look at.

With the outside and lining fabric folded in half, I cut a 12" x 14" piece.  Technically, when unfolded, it would be 24" long.  I then cut one piece of interfacing to match.


I attached the interfacing to the lining fabric and pressed it right side in.  I did the same with the outside fabric.  I then stacked the lining and outside fabric on top of one another.  It should be interfacing, lining face up, lining face down, interfacing, outside face up, outside face down.


I stitched all the way up both sides and flipped it right side out.  You should have the lining inside and the outside where it needs to be with interfacing in between them.    I then took extra wide, double fold bias tape and slipped it over the top edge and pinned it in place.


I then ran a seam around the top edge, connecting the bias tape to the bag.  Now the bag has a cute trim top.


Next, I measured out the handle lengths, cut them and put fray stop on all the ends, just to make sure they didn't come apart. I then pinned the handle in place.  I first sewed a square around the edge of them to secure them, then came in and stitched an "x" across them for extra stability.


 And that's it, the bag is done.  I slipped in a few Hello Kitty items and it was off to the pool for us.

 Thanks to my sister for the use of her camera after mine died and also letting me use her house to do this project.